Thursday 14 June 2012

Glitters in Paris

French manicures are, let face it, really awesome:
  • They're SO easy to do.
  • Really elegant
  • Practical for work if you cant go all out with a crazy design
So here is one of my favorite manicures to do when i'm limited on time.


By replacing the tip with glitter, it really gives it an extra something! I also love the clash of neon pink and gold. To be honest i think pretty much every colour combination works pretty well for the good old frenchie. My tip - always use the sparkly/darker colour on the tip as it makes your nails look longer.

xo

Sally Hansen Nail Art Pen

What i dont understand about this product is why someone hadn't thought about it sooner?!?!?! We've had those pot style nail art pens, but these are actually like pens, so ergonomic. 


So, this is some of the range Sally Hansen has come out with. My boyfriend is actually American (LA native) and when he went on his annual trip to the states, i sent him with a shopping list! i think his step-mum actually went out and got them, because lets face it, men are clueless when it comes to make-up and nails (they think we just roll out of bed looking gorgeous!) They're now available in the UK, Last time i looked on Ebay they were about £7 inc shipping.


She picked me up the black (one from the right) and a navy blue (fourth from the left)


Let me just make one thing clear - it may seem initially that there's no polish coming out and that its not working, but just shake it and carefully press down a few times and it'll work.


i got really impatient and broke the nib, so every time i use the black one polish just comes gushing out all over my nails. But the blue one works beautifully, I actually used both of the pens on my Aztec nails (see previous posts) If you do break the nib - pump out some polish onto a bit of paper/cardboard, wipe the nib clean, and just dip it in.  You can then use it as you normally would, just re-dip every time the polish runs out. don't dip it in for too long though, or the nib will soak up loads and as soon as it comes into contact with your nail, it'll all come gushing out. 


I would definitely buy more. They're so much better than nail art brushes that you have to keep dipping in the pot. Once i become less poor less of a student, i may invest. 


xo

Blue Leopard

I swear animal print will NEVER  go out of fashion. In light of the hairpin dots i wrote about previously, i thought i'd do the traditional two tone leopard print.


And heres how i did it

  1. I started off by painting a pale blue. 
  2. After that dried i used a darker blue and made various size dots with a hairpin.
  3. I then used my Sally Hansen nail art pen in black to half go around the dots. 
  4. I then did a few little extra black dots to fill in the gaps. 
I was particularly neat, but i think it looks better when its messy. Any colour will do, but i think it looks best when theyre the same tone, i.e dark pink/light pink and when the lightest colour is the base, otherwise the dots dont stand out.

xo

Hair Pin

Just a quick little post...

There are some really intricate designs out there, that require really small marbling tools or a tiny leprechaun manicurist. Everyone always recomends a tooth pick as an alternative, but i actually never have them in my house. They also seem to warp if too much polish or pressure is applied. So after a bit of googling i found such a great idea.


A hairpin. Why didnt i think of it? theyre great for doing tiny dots and other small designs.

xo

Nail Delights - Full Nail Decals

Now, i dont even know how i stumbled upon this website, but i use it almost religiously.


I think its because if you spend over £10 you get free delivery - which always makes me buy more than i intended. They have everything on there from tools to gems. One of the first things i ever brought from them were nail water decals 


In a time before nail wraps and stickers these were a lifesaver, and i honestly think i still prefer them to wraps etc. Nail wraps tend to warp and crinkle. These do crinkle but you can fold down the crinkle to make a smooth surface.


They come exactly the way they are pictured above. The best way to describe them is those transfer tattoo's we all had when we were younger (if you didn't have any, you obviously didn't have a childhood). Here's how to apply them:

  1. Cut them roughly to size
  2. Run them gently under a tap
  3. At this point i usually quickly apply some clear polish to help them stick better
  4. Put them onto your nail and hold them there for about a minute or two  
  5. Once all the nails are completed, apply some clear polish 
  6. Then like you would with nail wraps, use a small amount of nail glue on the tips.
Tip: do them one at a time. I know its time consuming, but its so worth it to not screw them up.

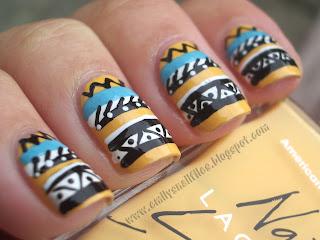
So heres a picture from when i did them last year for my holiday


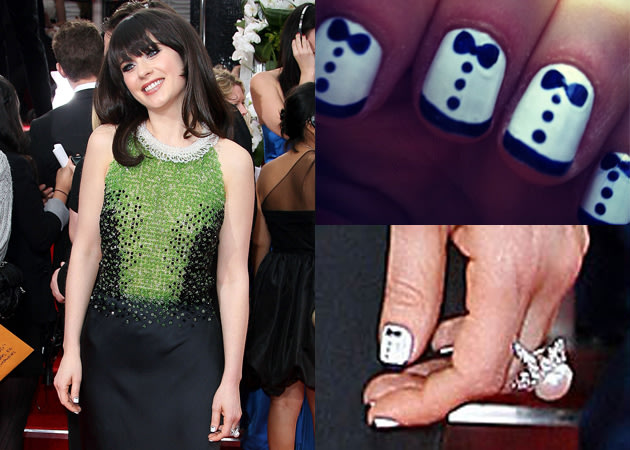
Katy Perry is also a fan (so you know they're a trend)


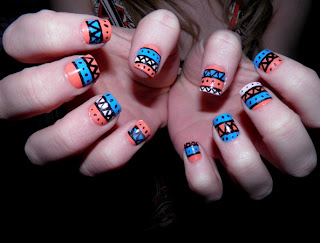
I also tried nail delights version of these

(sorry for the dodgy picture)

Everyone A lot of people complimented me. They last for ages, and are really striking. Sometimes instead of using the clear polish to make them stick, i use a white polish to make the slightly paler colours pop. 

xo

The Konad Stamper

So a lovely friend of mine just asked where i get all my nail stuff from. So im going to give you guys some of my secrets, tips and also some of my vendors.


Konad Nail Stamper


Lets start with my pride and joy - The Konad nail stamper. Its so easy to use, and theres so many different plates. My metallic print nails were done with one of these bad boys. If your not good at freehand designs, this will be your best friend. 


One word of caution though, don't try and save a couple of quid by buying replica plates. I brought some off amazon, which seemed exactly the same. They're shit bad quality. The real konad ones are worth it. On their website they have a list of all the plates and the designs on them with a corresponding number so you can hunt out the plates individually. I got them so long ago i dont actually know where i got them from, but i believe it was from ebay. Konad also sell their own nail polishes which i've never actually brought. My own seem to be fine, i just try and use quite thick nail polishes as thin ones don't make the design stand out so much. This was my first, and still my best, nail art investment. 


Heres a really good tutorial on the konad stamper if you've never used it before


http://www.youtube.com/watch?v=gVuMmik8Wh8


xo

Aztec


Whilst my father is selling my house, i thought i needed something to distract myself! so heres my few tips on Aztec style nails... ( i would have done a tutorial but i was too impatient)


These little gems are all over the catwalk, and look great in nude or neons. If your not up for the challenge of doing it freehand (i'm left handed so doing my left hand was tricky!) there are wraps available...


But then you loose all the fun...


So here is my interpretation


(ignore the plaster and dodgy lighting)


Now heres a step by step breakdown of how i did it:


  1. Painted on a yellow base (i used Barry M)
  2. I chose 2 clashing colours - Neon red and blue
  3. I painted various stripes on each nail
  4. Using my Sally Hansen nail pens in blue and black, i dotted, triangled and striped each nail variously
  5. Waited for the nail to dry completely and THEN applied a topcoat so the designs didnt run
And thats it! pretty simple, and its good for people who want to get a little adventurous with your nails.

xo

Wednesday 13 June 2012

Heavy Metal

Last year we saw a massive trend - Metallic Nails - and it's not just a fad!


The metallic collection was released in June 2012, just in time for the summer sun!


...And they look great on their own, but even better under an animal print!


(please ignore the dog ball thrower i'm holding!)


I used a konad stamper in both leopard and zebra print to achieve this, and the picture doesn't do it justice. Even if you don't have a Konad stamper, hand drawn patterns would look equally as good. They were subtly sparkly which really made the print pop. 


Also if your a bit confused of what a Konad stamper is, or how to properly use it, then watch this space. I shall be posting my tips and secrets about Konads amazing invention very soon! 


xo

Walking the dog


My pooch and i decided to head out into the lovely sunshine. I have a gorgeous pair of river island sandals that i was dying to wear, however this revealed on major problem. MY TOES. I'm ashamed to say i haven't done them in a few weeks, but i thought if i'm going to do it, i might as well go all out!


So i have some leftover nails inc stickers that i snapped up for £2! absolute bargain. They don't really work on my hands (my nails are a bit too arched) but they're perfect on my toes!


And this was the result! They've been on for AGES now. As i've previously said - use a bit of nail glue on the tips of the stickers, they'll stay on much longer!

They're normally £8 a set, and i'm not too sure if i would pay that (but maybe that's because i'm a poor student!)


xo

My First Kiss


Its no secret that nail art stickers seem like the perfect solution. However, i have the blessing of very arched nails (sarcasm just doesn't translate well on here!)


This means everytime i try to use them, especially the foil type ones, they crinkle madly. 


But i think those days are over!


I have finally found a brand which is perfect for me...


I came across these in boots, reduced to £2. I do love a bargin. Anyway, theyre kind of a plastically material, which is actually so much easier to apply. I chose a kiss design...


(sorry for the terrible picture)


it lasted for two weeks. HOWEVER... for some reason i was smart and tried to put on a top coat. this made it go VERY spongey, and took a long time to dry. i mean hours. 


Also a little tip - if you want nail stickers to last longer, use some nail glue on the tips. this is the primary place for chipping and doing this should prevent it. -


xo

Dinner Jacket


Welcome to the blog...


Prepare to be hooked! I am absolutely mad about nails, and i'm going to attempt to be your Guru! So lets get stuck in...


Although im not a massive fan of Zooey Deschanel (the geek girl thing just doesn't convince me) i am in admiration of who ever her manicurist is. 


I attempted these a couple of weeks ago, and was really surprised at how easy it was to achieve


I would have uploaded this as a tutorial, but its pretty self explanatory. I used a nail art pen, but i think its more than possible to do it with a tooth pick.


I got loads of compliments. After a few days i put little gems on the center of the bow to give it a little wow factor on a night out!


xo